.avif)

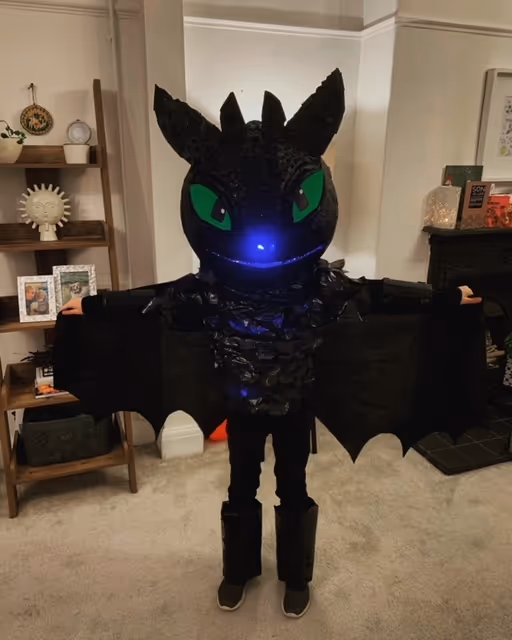
Homemade 'How To Train Your Dragon' Toothless Costume - Tutorial
You all know 'How to Train Your Dragon' but can you 'Make that Dragon' ? Here I show you everything you need for the perfect 'Toothless' fancy dress costume for any fancy dress party (*easily adapted to a white 'Light Fury' costume too.)
World Book Day is a charity event
held annually in the United Kingdom and Ireland on the first Thursday in March. On World Book Day, every child in full-time education in the UK is given a voucher to be spent on books, and most schools hold fund raising events where children get to dress up as their favourite characters from books.
My children are fortunate enough to go to a wonderful school, which holds a dressing up day each year for World Book Day. They do like to add an extra bit of stress to the parents by giving it a 'theme'. We've had animals from books, Mr Men characters and this time it was Dragons from books... easy right? wrong.

The day the school newsletter comes through with the theme my children get so excited they rush home to pull all the reading books out to find the character they want to be. For this theme my youngest chose Zog The Dragon, which I did a guide on how to make this costume here. My eldest gave me the not so easy job of making Toothless from 'How to train your dragon' (we went with the film version as the book series by Cressida Cowell is down to your own imaginative interpretation.)
So I thought I'd take some time to write up how I made this costume for any other struggling parents like myself who get tasked with this homemade costume for World Book Day, Halloween or, any other Fancy Dress event!
What you need
For the head
- Giant Inflatable Balloon
- PVA Glue and paintbrush
- Old newspapers
- Black acrylic paint (I used black spray paint I found in the shed. Sorry Hubs)
- Green card for the eyes
- White card for the teeth
- Glue gun and glue sticks
- Tinfoil for the shaping
- Masking tape to tape on foil (I didn't have any so used gorilla tape that I had in the shed. Probably shouldn't admit I used all that as well. Again, sorry hubs!)
- Cardboard (for the ears and to attach head)
- Black Glitter (That I also found in the she.... only joking)
- Black Glitter Glue (For detailing)
- A bike helmet
- A black sharpie
- Blue battery operated fairy lights
For the tail
- An old black belt
- An old pair of black leggings
- Black Felt for the tail spikes (I used 2 a4 sheets but the tail was the length of a pair of women's leggings so you may need less if you're making a smaller one for little monsters.
- Needle and black thread
- Glue gun and glue sticks
- Black glitter (I used the same pot as I used to the head)
- Black rhinestones (mine were leftover from my competitive dancing days but you can get cheap ones online now)
- Balls of newspaper to stuff the tail
- 2x squares of cardboard to attach the tail to the belt (that you'll need to paint/spray) black
- Two pieces of card shaped like the 'spade' of the dragon's tail. (You'll need to paint/spray 1 black and 1 red)
- A piece of white card for the Dragon Hunters' flag symbol that goes on the red side of the dragon tail.
For the Wings
- 1 meter of black fabric (I used an old bedsheet)
For ankle/wrist cuffs
- Cardboard
- Stapler and staples
- Glue gun/glue sticks
- Black glitter
For The Body
- 2 x Black trash bin liners
Extras
- Black trousers and a long-sleeved black jumper to wear underneath
Method
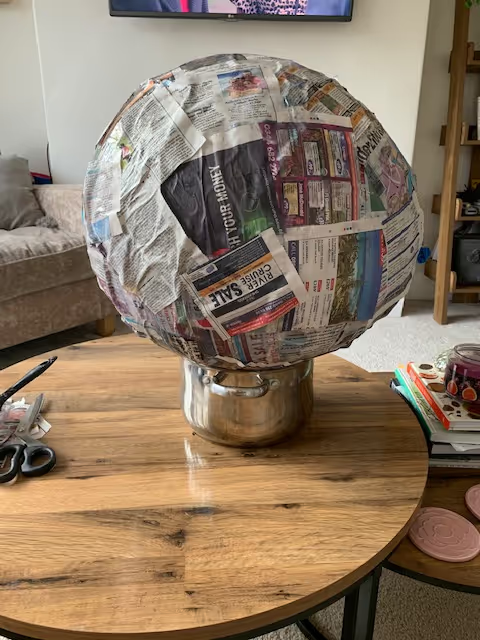
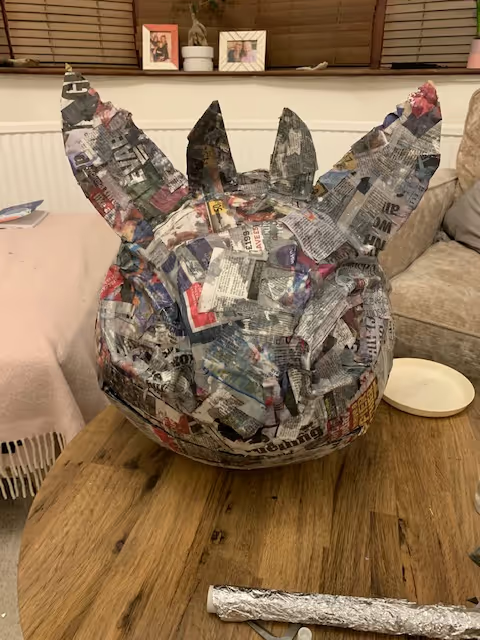
1. Inflate your giant balloon and place it on top of a large saucepan which makes it easy to access from all angles, and saves your furniture from glue! Take your newspaper and tear it into strips. To start your paper mache, take your paintbrush and start to paint your giant balloon, and lay strips of your newspaper on top.
I did it in sections to ensure the PVA glue didn't dry before the paper went on. Once the balloon is entirely covered you will need to leave to dry. The paper mache took me 3 days. I did 5 layers, one layer each morning and one layer before bed. Make sure each layer is dry before you start the next.
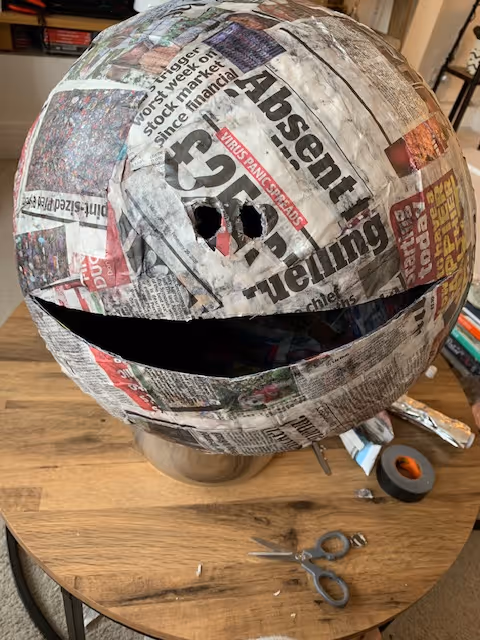
2. Once you have built up your paper mache layers you will need to mark out the facial features using a pencil, and cut them out using a sharp crafting knife (please be careful doing this). You will need a mouth, two nose holes, and a hole to put your head in (fit a bike helmet through) at the bottom for my design.
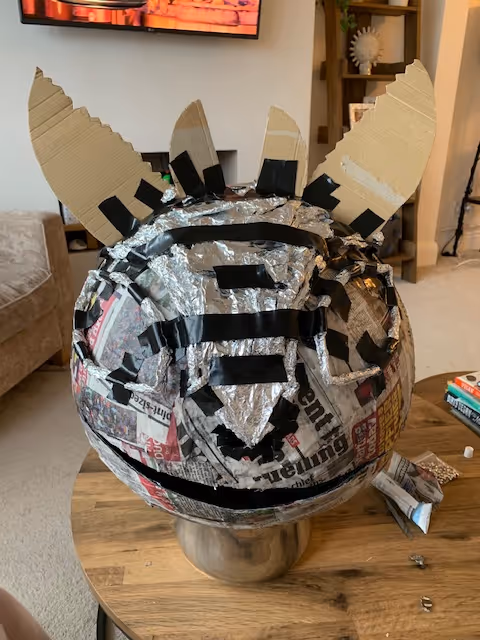
3. Now take your tinfoil and start to mould to the shape of your features. I used it to make a protruding section for the nose and two eye sockets. I then used tape to tape them in place (I used gorilla as it's all I had but masking tape will be fine too)

4. Now time to cut the shape of the ears out of your cardboard and tape them in place. I did a roll of foil and laid it behind the ears and taped the ears back onto it so they were slightly reclining over it.
5. Back to the paper mache. You'll need to do 3-4 layers of paper mache (same technique as step 1 leaving gaps to dry) to ensure that all foil features and ears are covered.
You will need to manipulate the ears in this process to make sure they remain leaning back.
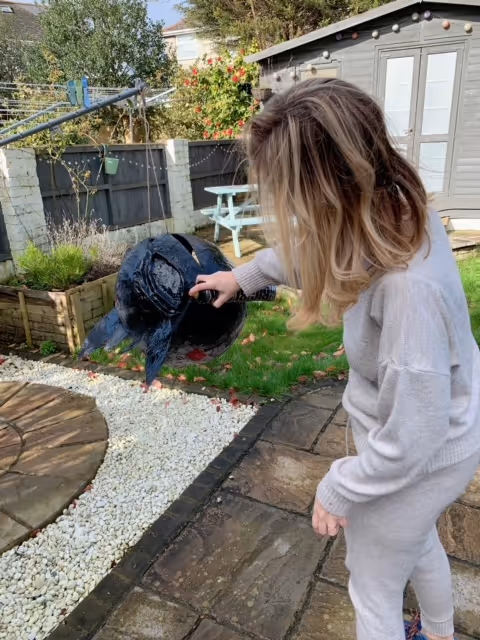
6. Once covered and dried it's time to paint. I found the easiest way to do this was to use a piece of string a tie it to the washing line on a sunny day. I wanted to do this as cheaply as possible, so instead of buying things I just used things I already had... *enters husbands spray paints*. Spray painting has such a slick finish. A water-based spray paint has always a better environmental profile and spray paint cans have a long shelf life.
If it is completely empty, your aerosol can may go into the normal recycling for cans/tins. To spray paint it was easier to hang from the washing line, but I think if I was to paint it I would have done it on the saucepan (and covered the pan in clingfilm to keep paint-free. Give a couple of coats of paint to ensure all is covered
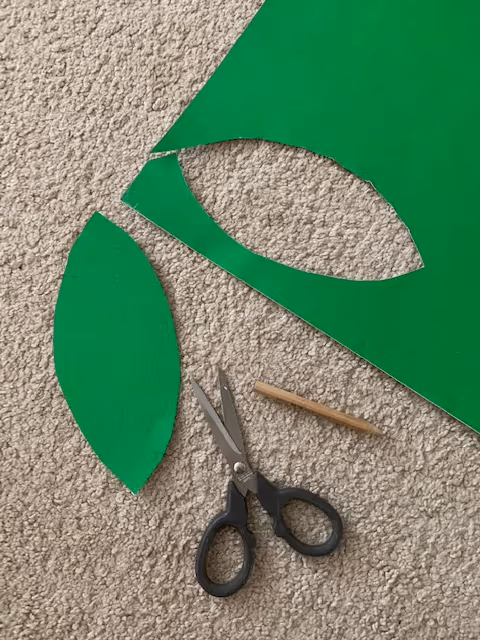
7. Cut out eye shapes from your green card to fit in the 'eye sockets' on your head. I used a black sharpie to colour in the pupil and a tiny piece of white card for the reflection. I used my glue gun to glue onto the head.
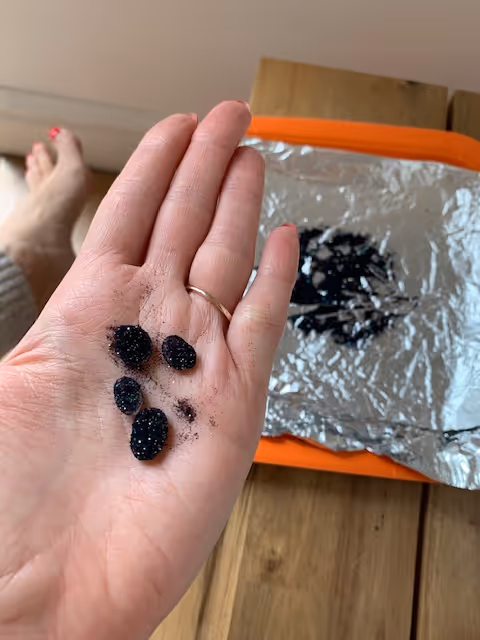
8. For the scales on the head, I lay down some tin foil on a tray and sprinkled black glitter on it. I then got my hot glue gun and made little blobs on top of the black glitter.
When the hot glue was a bit cooler and starting to form I'd press it into the glue and turn it over to cover the other side in glitter. I repeated this lots of times to make enough to cover the protruding nose section of the head, up the ears and enough for the ankle and wrist cuffs that you'll be making later.
9. I glued the glitter scales onto the head using my glue gun. It gave the head great texture.
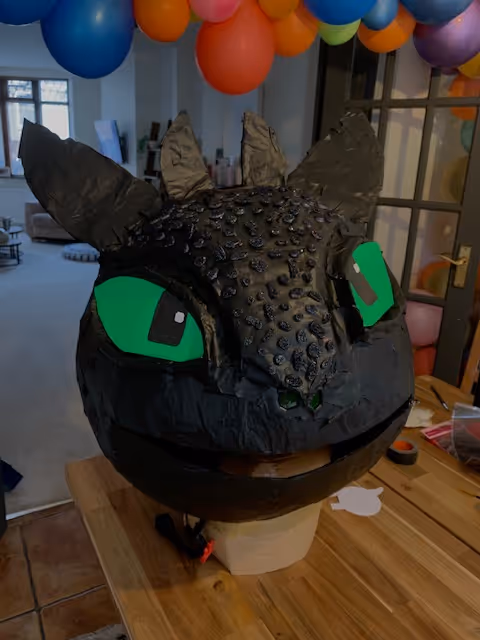
10. I cut little white triangular spikes for the teeth and used my glue gun to attach to the mouth.

11. I used my black sharpie to colour in any bits of newspaper that were showing through the paint.
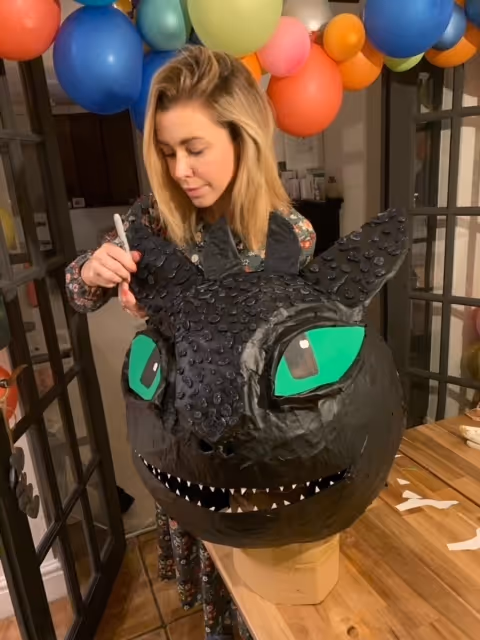
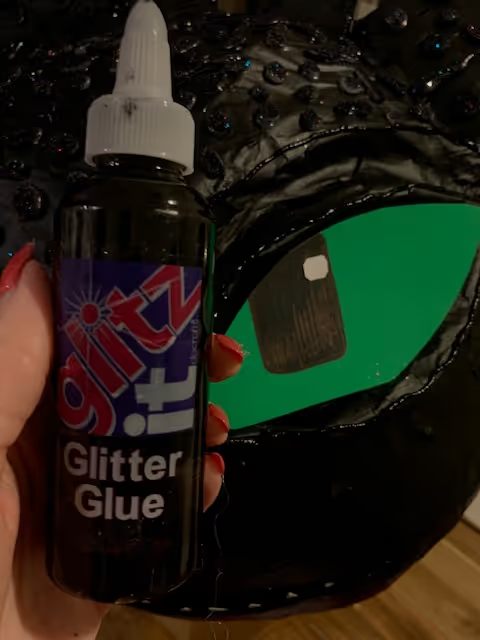
12. I used some black glitter glue to add more details on the face. I went around the eye sockets and outlines the shape of the nose.
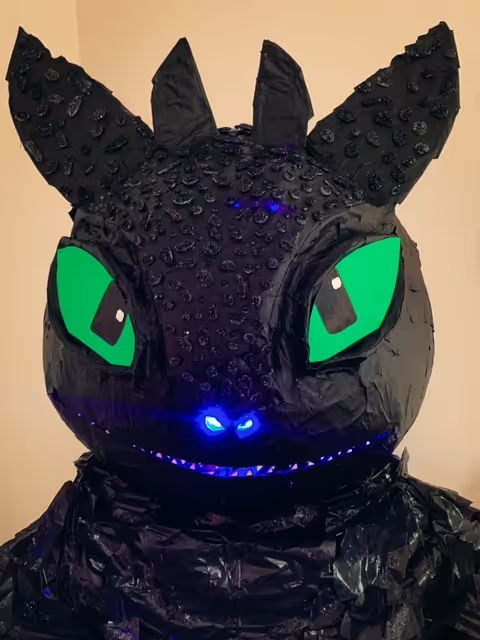
13. For the lights inside the nostrils I used my kong tape to secure the wires around the inside of the nostrils and tape the battery pack securely to the bottom, inside of the head.
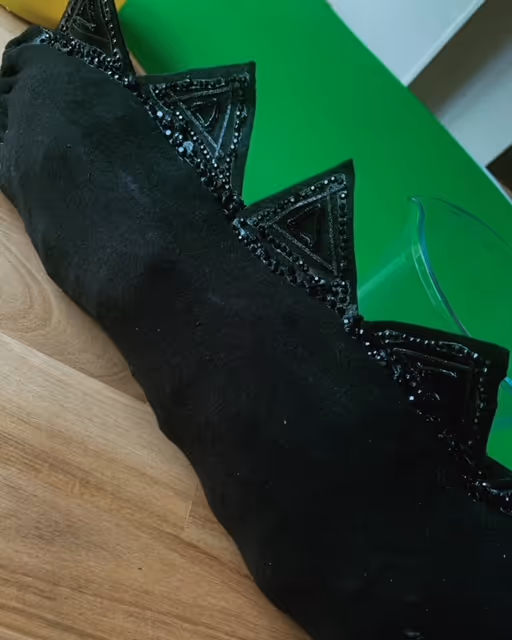
14. For the tail I cut a leg off an old pair of women's black leggings. Glue together the seam of the ankle end with a glue gun, waited for it to dry, and then stuffed it with balls of newspaper. I sewed up the open (thigh) end with a needle and thread. I then cut triangles out of black felt for the tail spikes and used my hot glue gun to glue a line of those running down the top of the tail.
To cover the dried glue at the base of the spikes, I put more glue on it (covering glue with glue) and sprinkled it with black glitter, and added on the black rhinestones. I did this a spike at a time as hot glue dries very quickly!
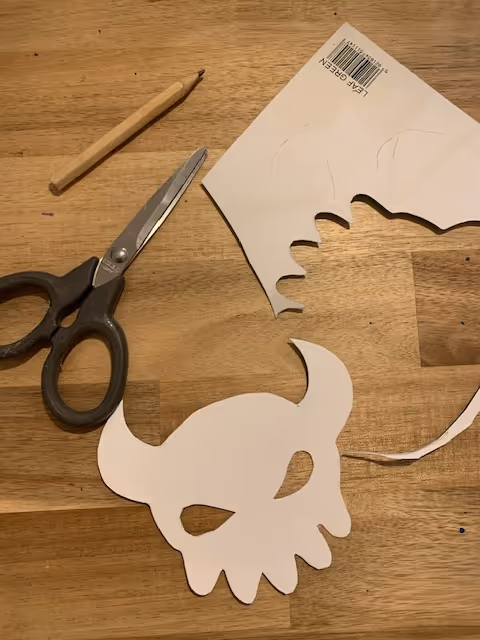
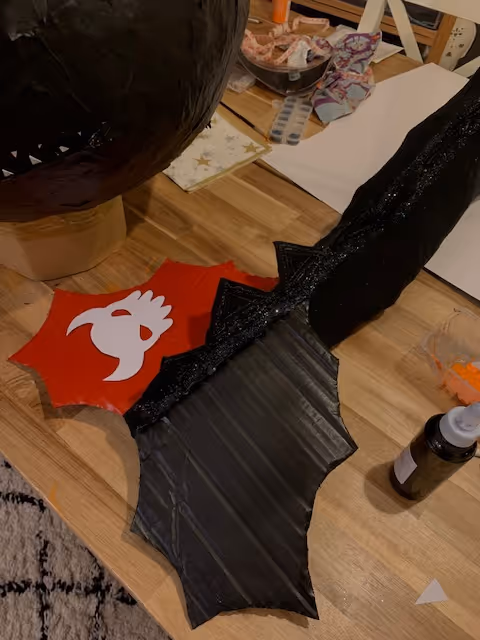
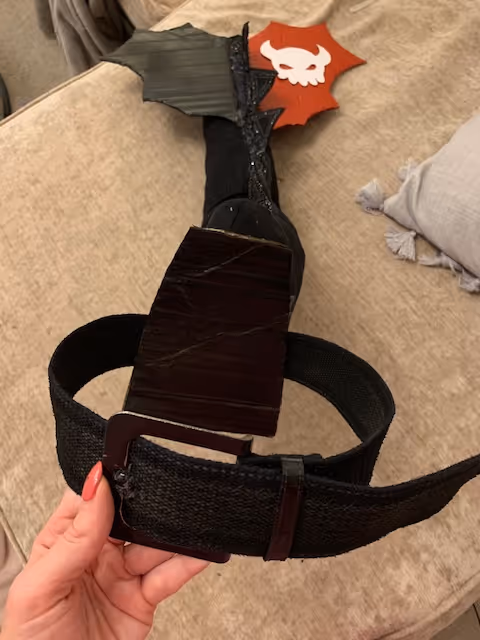
15. I cut the dragon's tail 'spade' out of cardboard and sprayed one red and one black. once dried I turned over and did the other side. They need to be exactly the same size/shape.
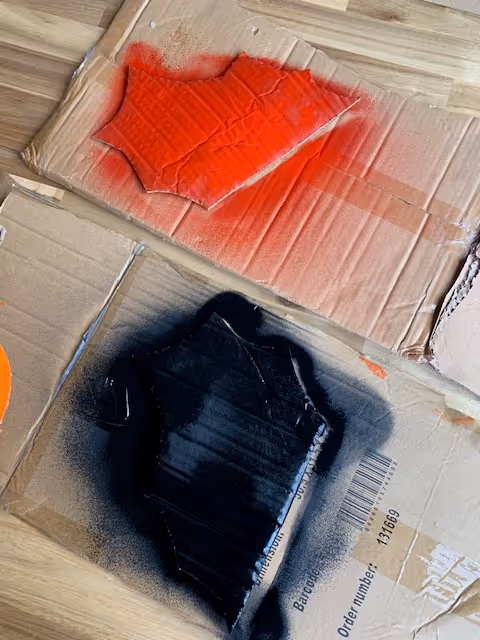
16. I cut the Dragon Hunters Flag symbol out of a white card and used PVA to glue it onto the top of the red side of the tail spade.
17. I used my hot glue gun to secure the dried spades in place on the end of the tail (as pictured below)
18. I cut two squares out of cardboard and sprayed those black on both sides. Once dried I used my hot glue gun to stick one to the end of the tail (thickest top end of the tail). I lay the middle of the old black belt in the middle of the card, and secured it there with my glue gun. I then sandwiched this with the remaining black cardboard square.
19. For ankle and wrist cuffs, I used cardboard that I rolled around my son's wrist and ankles to measure it up, I then took them off and stapled them together. I spray-painted the inside and outside of the cuffs and decorated these with the hot glue/glitter scales too.
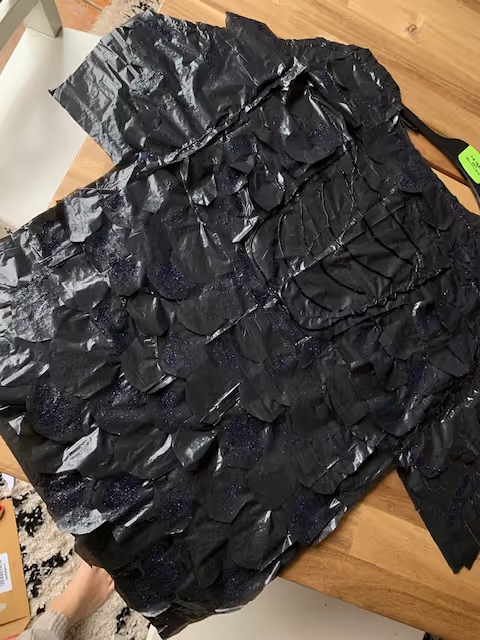
20. For the top I lay down a black t-shirt on a black trash bag and cut around it. I used kong tape to tape sides together so it was more like a t-shirt. I then used my second black bag to cut out scales and used PVA glue to stick these on (don't use a glue gun as it will shrivel up the bag...trust me, I learned the hard way)
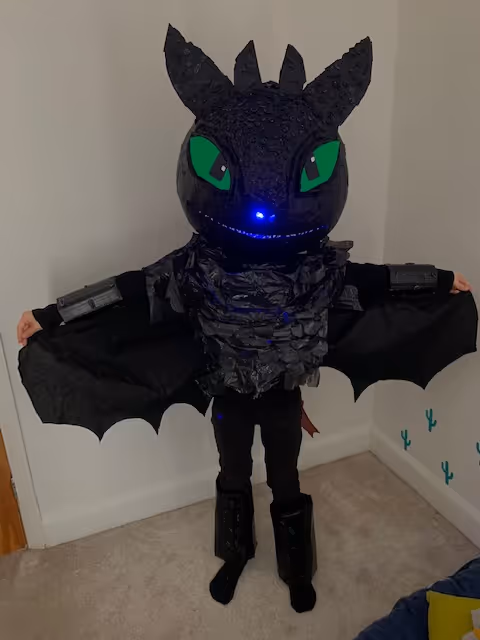
21. For the wings I did a REALLY rushed attempt (I'm talking 2am the day my son was wearing it for world book day) I cut a straight line across the top of black fabric and wing shape at the bottom. I attached the ends with glue to the cuffs (the picture below will explain a lot better I think). This is the only part I wish I could have gone back and redone.
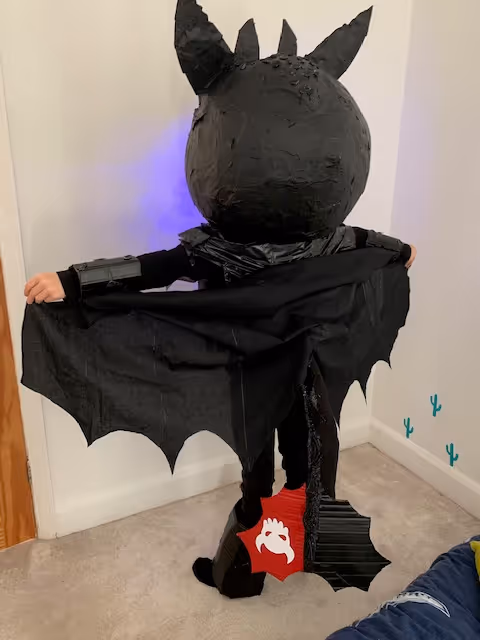
22.To make the head more secure to wear I made a 30cm width by 70cm length cylinder out of cardboard, and used the Gorilla tape to fix it to the inside top surface of the head. I then taped the bottom circumference to a non peaked skateboard helmet.
I then got my son to put his head up into the toothless head so the helmet sits on his head - You may then need to gage whether or not you need to take some height off the cylinder - the head needs to rest on your shoulders.
So if you have made it to the end, and are thinking of giving this cozzie a go, then I hope your homemade Toothless costume is made without a hiccup...
For 29 more of my children costume ideas click here.
Share if you care ....

MoG x
Mother. Blogger. Maker. Baker.
Queen of the Sandals and Breaker of Paper Chains.

Father of Grom
Father. SEOnsai. Builder. Mugician.
Gen Xer Prancer and Breaker of Dancer.
MoG x
Mother. Blogger. Maker. Baker.
Queen of the Sandals and Breaker of Paper Chains.

.jpg)


.png)